Showing posts with label Vegetable Carving. Show all posts

Thursday, November 3, 2011

Spring Onion Flowers

After a long time. I am back with one more vegetable carving. Though I have already dealt with this before, this time it is a bit different. 

My previous post I showed you how to make Lilies out of spring onions which is here:

Required:

Spring onions with leaves
Bamboo skewers (or Dried veins of Coconut leaves)
Sharp knife

While buying the spring onions make sure that they are fresh. No wilted, broken or crumpled leaves. The bulbs should also be  medium sized (not too small or too thin), round, healthy and perfect with no damages etc.

Clean the onions and leaves thoroughly with water taking care not to damage any part of them. Drain them on a soft thin cloth till they are completely dry.

Now separate the bulbs from the leaves, just cutting at the base portion of the greens. But see that the greens remain as a bunch and do not get separated. The bulbs should be at least 5cm (2").

Now slice of the root portion of the bulbs taking care that the layers of bulb do not get separated. Remove the outer layers(dry ones) on the bulb.Holding the root side away from you and leaving at least 1cm or so at the top, make vertical slits from top to bottom. 
The slits should be deep enough to reach the center and a little apart from each other. Slowly rotating the bulb, continue to make the slits. 
Now slightly pry open the layers and immerse in ice cold water for 15 minutes or till the onion blooms. Remove and drain these flowers.


For leaves, take a bunch of greens. If required, snip off the tops at different levels to adjust the height of the shoots to suit your requirement. Now pierce a bamboo skewer through the base of the greens and into one of the leaves (preferably the center shoot) slowly taking care not to rip the shoots. 
At the top attach the flower and arrange in a vase or a glass or as you would like it.

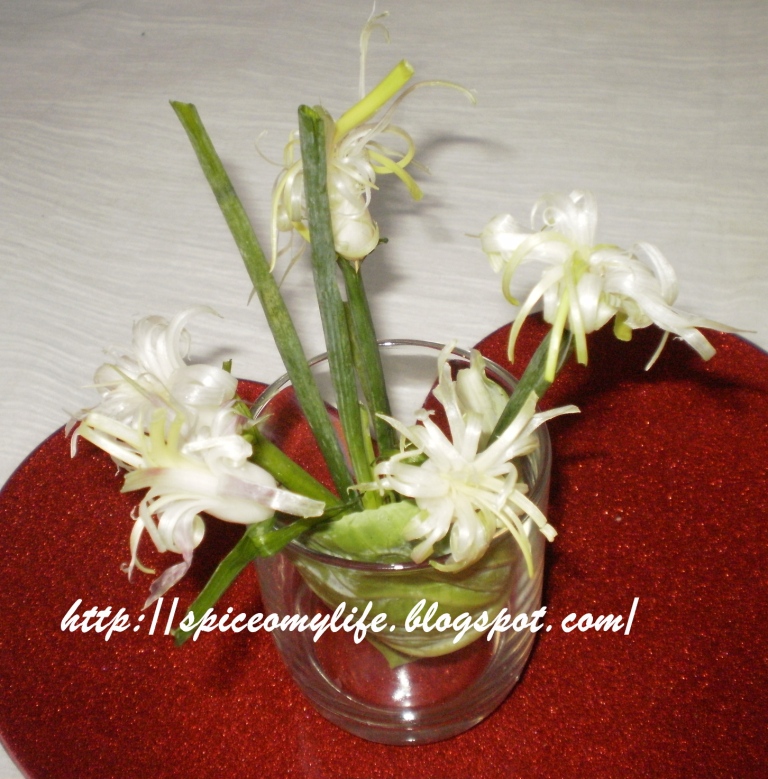
I din't have much shoots left with me when I attempted this. So you see only a few greens. But this arrangement will look good with more greens.  This will make a good arrangement on a dining table or a side table. Depending on the space available make a bigger or a smaller arrangement.

Keep watching for more to come.....

Wednesday, June 1, 2011

Papaya Boats

Its is always a challenge to serve the food in new and creative ways. It makes food interesting and appealing. Children who fuss about eating, will have to be wooed to eat  healthy food. What better way than making their food appealing to them?


This is a papaya Boat. Clean the fruit thoroughly. Cut it vertically into two halves. Remove all the seeds. 

Peel one of the halves and chop into pieces. Garnish with a little salt and pepper and spices/herbs of your choice.

Place the other half on a tray or platter. Put these pieces into it, chill and serve. 

If the boat is wobbly and not able to stand properly, slice of a piece at the bottom, so that it can stand. If you want you can peel the boat too.

Papaya boats can also be used for serving, fruit salads and ice creams. This will make a very healthy and nutritional snack. You can choose small fruits for serving individually.


Saturday, May 21, 2011

Flowers With Vegetables


I am not able to post much on this blog. My hands are full these days as I have to look after my mom. She is recovering from surgery. Today as I was cooking, I was fiddling with vegetables. This is what I tried...
These flowers are made from the peels of cucumber. Today I made cucumber chutney. When I saw the peels it just struck me that I should try making flowers from the peels. the colour was appealing. So I just shaped the peels a bit and made these flowers. In the center I used tips of the carrot. For the stems and leaves I used peels of Ridge gourd.
Here I used slices of carrot for the center.

Here I used slices of Ivy Gourd or popularly known as Gentleman's Toes for the center. I  used carrot slices as berries.
 This is the yellow round Cucumber which is eaten widely here.
This is the Ridge Gourd.

 The flowers can be used for garnishing or for decorations. It was my first attempt. I am yet to experiment with these more. Hope you like it....


Saturday, February 20, 2010

Vegetable Carving-Monkey

Friends it has been a long time since I posted on this blog. I have lots and lots to share but no time at all. And witting out recipes I find is not easy.  Well here I am with vegetable carving again.
This time its a monkey.


As you can see, the body is made of Pine apple with top cut off and used as a cap. Its hands are brinjals of long variety. The face has been made out of round and yellow cucumber. Its eyes are black grapes secured with tooth picks. Its mouth and ears have been made out of Sweet Lime or Mausambi in Hindi and Battayee in Telugu. All are secured using tooth picks. It has wilted a bit. I could not photograph immediately.

These can be arranged on dining tables or side tables with flowers, foliage or fruit bowls to add beauty.

Monday, November 9, 2009

Spring Onion Flowers


I am back with one more Vegetable carving. These days I don't get enough time to do all these things. Just rustling up a passable dinner after a long and tiring day in itself has become difficult for me. Shame on me. Where has all the enthusiasm gone?


For the spring onion flowers,  we will require;
  • Bunch of Spring Onions
  • Thin Bamboo sticks or wire or dried veins of  coconut leaves 
  • A sharp knife 

  1. Select a bunch of fresh looking spring onions. See that the greens are healthy and not wilted. The onion bulbs should be long and not too fat or round.
  2. Now separate the greens from the bulbs
  3. Cut the root portion off the bulbs
  4. Now place cuts on the base (root side) of the bulb, first in + shape and again X shape taking care not to separate the pieces. That is the cuts should be up to 3/4ths of the bulbs.
  5. Now place the bulbs immersed completely  in cold water and keep it in the refrigerator (not in deep freeze) for half an hour or so. This will open the cut portions apart like petals of a flower. After half an hour or so the bulbs open up like a flower.
  6. Now pass the sticks or wire through the hollow greens of the spring onion. If you use wire you can twist or bend a little to give it a required shape. At the end attach the flowers and arrange in a vase according to your taste.  I have used the dried veins of the coconut leafs cut into required lengths.
  7. Here are the pictures. I think you can follow them. But if you don't let me know please.


The greens separated form the bulbs and the sticks.
 
Pass the sticks through the greens of the spring onion.

Attach the flowers and arrange them in a vase.

 
Or you can just garnish a dish according to your fancy and serve.

These flowers can be made a day before and stored in refrigerator if you are planning a party. But store carefully without damaging the petals.

So why don't you try and let me know.